
A poorly lit staircase at night is a real hazard. No exaggeration, no fear-mongering: falls on stairs are a leading cause of serious domestic accidents, especially for children and seniors. Yet, most homes only have one switch at the bottom and one at the top — with nothing to guide you in the middle of the night.
The good news is that LED stair lighting no longer requires an electrician, major renovations, or an astronomical budget. Today, there are two main approaches: one focused on nighttime safety (automatic, discreet, functional) and one focused on decor (LED strip lights under stair nosings, creating a visual continuity effect). This guide walks you through both — so you can choose based on your actual needs, not what the algorithm wants to sell you.
Two Different Approaches to Stair Lighting
Before you grab a screwdriver or double-sided tape, clarify what you're really looking for. These two needs aren't solved with the same products.
Safety Lighting: Illuminating Stairs at Night Without Waking Up
This is the most common and useful application. You want a light that turns on automatically when someone goes downstairs at 2 AM, isn't blinding, and turns off by itself. Nothing else. No wires, no remote control, no voice commands — just a simple logic: motion detection + soft light.
For this, wireless solutions with integrated motion sensors are the most suitable. They don't require modifying existing electrical installations, which is a major advantage for renters and anyone who wants to avoid renovations.
Color temperature matters a lot in this context: warm white (3000K) is what you should aim for. It provides enough light to see the steps without assaulting the eyes of someone who just got out of bed. Cool or neutral white (4000K+) at 2 AM is a bad idea for a brain trying to get back to sleep.
Decorative Lighting: The Strip Light Effect Under Steps
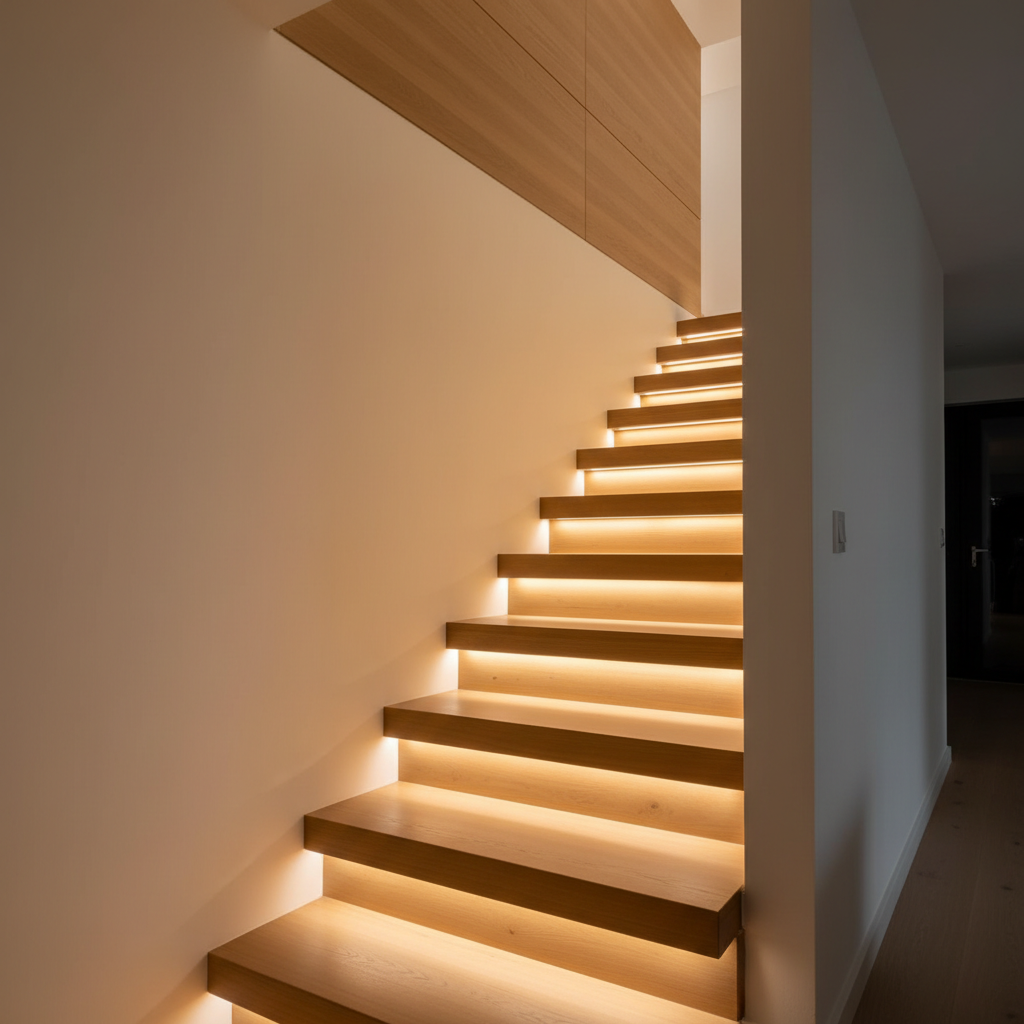
The other approach is purely aesthetic. You want to create that effect you've seen in photos: each step subtly highlighted by a luminous strip running under the stair nosing, creating visual continuity from the bottom to the top of the stairs. It's beautiful, architectural, and transforms an ordinary staircase into a focal point.
This type of installation almost always relies on LED strip lights placed under each riser or on the underside of the stair nosing. For a continuous and uniform effect, wired solutions remain visually cleaner — although some rechargeable LED strip lights can achieve a similar look without wiring.
These two approaches are not mutually exclusive. In some staircases, you can combine a motion-sensing light bar on the wall for nighttime safety with a decorative strip light for visual effect in the evening when the house is normally lit.
Approach 1: Installing Automatic Stair Lighting Without Renovation
This is the most accessible, fastest, and often most relevant solution for 80% of home or apartment staircases. Here's how to do it, step by step.
Time needed: 10 to 20 minutes depending on the number of installation points.
Materials: A wireless LED light bar with motion sensor, a clean cloth.
Skill level: No technical expertise required.
Step 1: Identify the Best Locations on the Wall
The goal isn't to illuminate the staircase like a theater stage, but to light the steps enough to walk without tripping. Two positions are effective depending on the configuration:
- At the top of the stairs (landing side): Illuminates the first few steps and the landing, where most falls begin.
- At the bottom of the stairs: Useful for guiding descent from the hallway.
- Mid-height if the staircase has more than 8-10 steps: Ensures no area is in shadow.
For a standard straight staircase in a single-family home, one light bar at the bottom and one at the top of the side wall usually cover the entire area. The motion sensor should be oriented towards the passage area, not towards the wall.
Step 2: Prepare the Mounting Surface
Whether you're using industrial adhesive or a magnetic mount, the surface must be clean, dry, and dust-free. A slightly damp cloth is usually sufficient. Avoid very porous surfaces (exposed brick, rough plaster) where the adhesive may not stick permanently — prefer a painted or tiled surface.
Allow the surface to dry completely before applying the adhesive. On a freshly painted surface (less than 7 days old), wait before installing: the paint will not yet have reached its maximum strength.
Step 3: Position and Mount the Light Bar
Adhere the adhesive mount to the wall at the chosen height — generally between 31.5 inches and 39.4 inches (80 cm and 1 m) from the floor for a stair wall, so it illuminates the steps without being in direct line of sight. Wait 30 seconds for the adhesive to set, then clip the light bar onto the magnetic mount.
This is where magnetic mounting truly makes a difference: if you want to move the light bar for recharging or adjusting the angle, simply detach and reattach it. No screws, no wall damage.
Step 4: Configure the Motion Sensor
Most LED light bars with motion sensors have two settings to check before first use: the ambient light threshold (so the light doesn't turn on in broad daylight) and the duration of illumination after detection (often adjustable between 10 and 60 seconds).
For a staircase, a duration of 20 to 30 seconds after the last movement is a good balance: long enough to go up or down the entire staircase, short enough not to waste battery life. If you want to dive deeper into this, check our guide on optimal motion sensor settings.
Step 5: Test and Adjust Sensor Angle
Walk through the staircase, mimicking passage: go down, go up, move at different speeds. If the light doesn't turn on, the sensor is pointing in the wrong direction or the sensitivity is too low. Most light bars allow you to slightly adjust the sensor's orientation — use this to fine-tune.
An often-overlooked detail: check that the light bar doesn't trigger inadvertently due to a draft, a window opposite, or pets. If it does, slightly increase the detection threshold.
Approach 2: Decorative LED Lighting Under Steps (Wired Strip Light)
If the goal is aesthetic — that grazing light effect under each step — the technique is different and requires a bit more preparation.
What Type of LED Strip Light to Choose for Stair Steps?
For decorative use under stair nosings, a low-profile LED strip light is sufficient. Key points to consider:
- LEDs per foot/meter density: The higher it is, the more uniform the lighting and the less visible hot spots.
- Color temperature: For a warm and inviting effect, stick to 2700-3000K. For a clean, contemporary interior, 4000K works well.
- Width: A thin strip (0.3 inches / 8mm) is more discreet than a wide strip (0.5 inches / 12mm) on the underside of a riser.
For straight staircases with a maximum of about twenty steps, rechargeable LED light bars can also be a wireless alternative, though they are better suited for shorter staircases.
How to Install an LED Strip Light Under Steps?
Installation is done in several steps:
- Measure each step: Widths are not always identical from one step to another, especially in older homes.
- Cut the strip to the correct lengths by cutting only at designated points (marked by lines or scissors on the strip).
- Clean the underside of the stair nosing before adhering: dust and grease prevent the adhesive from sticking.
- Run the power cable along the baseboard or wall (an adhesive cable channel is often sufficient and cleaner than you might think).
- Connect to a 12V or 24V transformer depending on the chosen strip — this will be plugged into an outlet.
For solutions that don't require electrical work and offer more flexibility, explore our article on stair lighting solutions — it compares the options in detail.
Do You Need a Controller or Sensor for Decorative Strip Lights?
A decorative LED strip light operates continuously (on as long as it's plugged in) or via a switch. To automate this type of installation, you need to add an external motion sensor connected to the circuit — this is where it gets more complex, and an electrician's intervention is often preferable.
If you want automation without the work, revert to Approach 1 above, or combine the two: decorative strip light for ambiance, motion-sensing light bar for nighttime safety. The two coexist very well.
LED Stair Lighting: What It Truly Changes for Safety
It's often talked about as a comfort. It's also a concrete safety issue. Falls on stairs are one of the leading causes of serious domestic accidents, with overexposure for the elderly and young children — two populations that often share the same roof.
An automatic 3000K light in the staircase doesn't look like high-tech equipment. It's similar to a smart night light, but better. And the difference with a professional wired system is notable: a wired automatic stair lighting system installed by an electrician typically costs several hundred dollars in labor, depending on the configuration and length of the staircase.
One or two wireless light bars with motion sensors provide the same nighttime safety function without any wiring. If you have parents living with you, young children, or if you often get up at night, it's one of the most useful and least expensive additions you can make to a home.
The Lumic Movement 3.0 is designed for this type of use: it installs in less than a minute on the wall (magnetic mount + adhesive backing), operates in warm white at 3000K, and its 3000 mAh battery lasts approximately 4 to 6 weeks in detection mode depending on the chosen model (9.1 inches or 15.7 inches / 23 cm or 40 cm). It comes with a 5-year warranty and a 90-day return policy if it doesn't suit your needs. If you're unsure about the right wireless light bar model for a staircase, our guide on choosing a wireless LED light bar can help clarify things.
Common Mistakes to Avoid During Installation
Placing the Light Bar Too High on the Wall
The higher the light bar, the less effectively it illuminates the steps below. A placement between 31.5 inches and 39.4 inches (80 cm and 1 m) high on the side wall of the staircase generally provides grazing light on the risers, which is exactly what you want to see the steps without being dazzled.
Choosing Too Cool a White for Nighttime Use
A 5000K or 6000K white is excellent for a workshop or kitchen when cooking. In a staircase at night, it assaults the eyes and disrupts sleep. For any nighttime use, stick to a maximum of 3000K. This also applies to a hallway — automatic hallway lighting follows the same logic.
Neglecting the Sensor's Illumination Duration
A sensor set to 10 seconds is often too short for an entire staircase. The light turns off while you're still on the steps — which is exactly what you were trying to avoid. Aim for 25 to 35 seconds minimum.
Applying Adhesive Without Cleaning the Surface
This is the number one reason light bars fall off after a few weeks. A quick wipe with a dry or slightly damp cloth takes 30 seconds and makes all the difference. On a dusty or greasy surface, no adhesive will hold permanently.
Installing Only One Light Bar for a Long Staircase
A staircase of 12 steps or more needs at least two lighting points: one at the bottom and one at the top. A single light bar creates a shadow zone in the most critical area — often the middle steps, where you are furthest from both landings.
Which Solution to Choose for Your Staircase?
| Situation | Recommended Solution | Work Level |
|---|---|---|
| Nighttime safety, renter | Wireless light bar with sensor, 3000K | Zero |
| Nighttime safety, homeowner | Wireless light bar OR wired lighting depending on budget | Low to medium |
| Decorative effect, short staircase (6-8 steps) | Rechargeable LED light bars under steps | Low |
| Decorative effect, long staircase (10+ steps) | Wired LED strip light under stair nosing | Medium to high |
| Combined safety + decor | Wired decorative strip light + wireless motion-sensing light bar | Medium |
Quick Checklist Before Finishing
- The light bar is positioned between 31.5 inches and 39.4 inches (80 cm and 1 m) high on the side wall.
- The surface was cleaned before applying the adhesive.
- The chosen color temperature is 3000K for nighttime use.
- The illumination duration after detection is set to at least 25 seconds.
- The sensor is oriented towards the passage area, not towards the wall.
- You have tested the trigger by going up and down the stairs.
- For a staircase with more than 8 steps, you have installed at least two lighting points.
LED stair lighting is one of those rare additions that combines immediate utility, real safety, and ease of installation. Whether you opt for the wireless motion-sensing version or the decorative strip light effect, the result is visible from the first night. And if you want to see how the same principles apply to other areas of the house, our guide on automatic closet lighting shows how motion detection also transforms other everyday spaces.