
A poorly lit staircase at night is a real hazard. No need for statistics to know this: if you've ever missed a step looking for the next one at 3 AM, you get the idea. Stair falls are the leading cause of home accidents among seniors, yet stair lighting often remains neglected or an afterthought.
This practical guide presents two main approaches — LED strip light under stair nosing and LED light bar or spot on the side wall — highlighting their real differences, the number of lights needed based on your staircase length, and how to choose the right color temperature to avoid glare at midnight.
Top 2 Methods for Stair Lighting
There are two main philosophies for indoor stair lighting. One focuses on a refined visual aesthetic, the other on simplicity and immediate safety. Neither is universally better; it all depends on your budget, your status (homeowner or renter), and the actual use of the staircase.
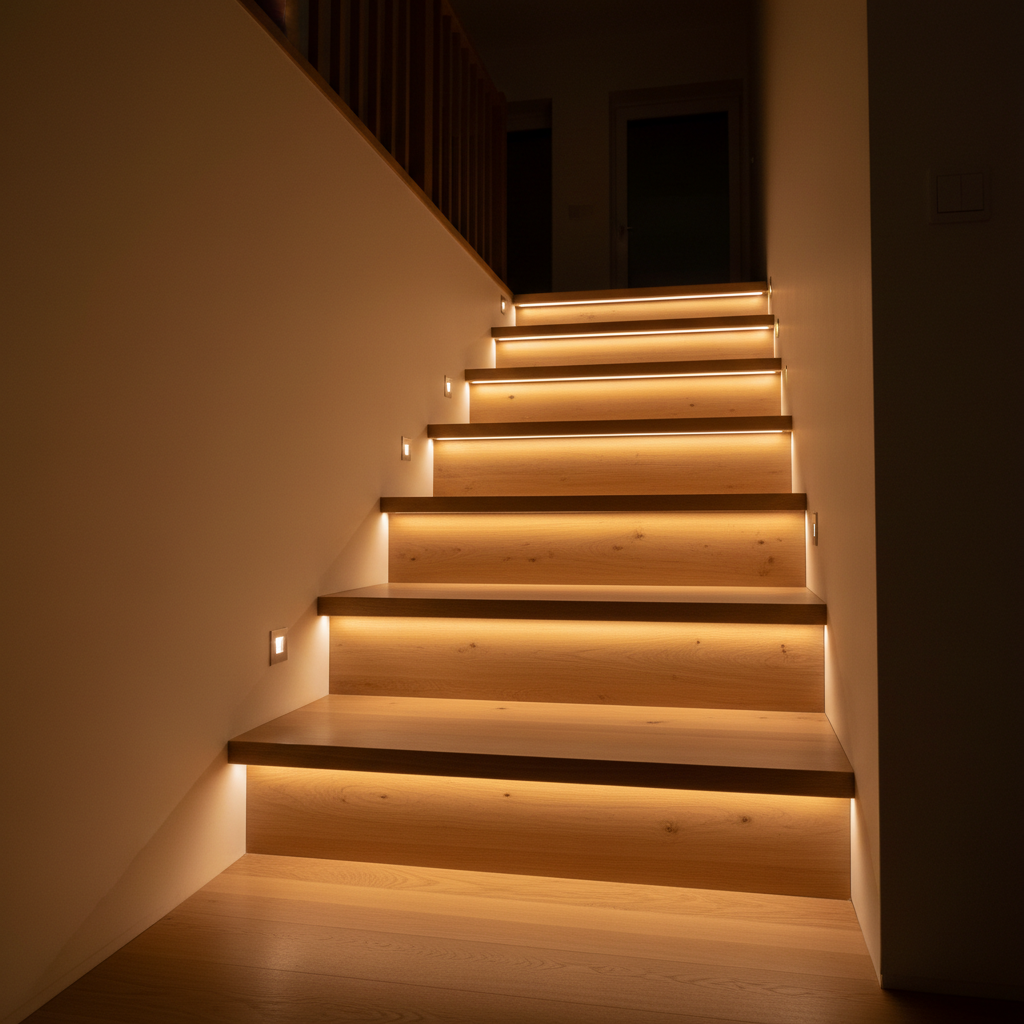
LED Strip Light Under Stair Nosing: The Most Beautiful Look
Placing an LED strip light under the nosing of each step creates a spectacular visual effect. The light skims the surface, each step is precisely highlighted – it's the option seen in high-end interior design magazines.
The problem is, this beauty comes at a price. For a standard staircase of 12 to 15 steps, you need as many LED strip segments, one or more power supplies, recessed aluminum profiles to diffuse the light cleanly, and especially an electrician to connect everything. In practice, such an installation typically costs between $500 and $1,000, sometimes more depending on the complexity of the job and desired finishes. If you're a renter, forget this option: it involves permanent modifications.
This is a true solution for a planned renovation with a dedicated budget. Not for a quick fix or securing a staircase this weekend.
LED Light Bar or Spot on the Side Wall: Simple and Effective
The alternative, less photogenic but infinitely more accessible, involves mounting one or more lights on the stair wall — at step height or slightly above. Side lighting creates a luminous line that guides the eye and foot without glare.
This approach allows for wireless LED light bars with adhesive or magnetic mounting, no drilling, no wiring. Installation takes minutes, not hours. And if you move one day, you take everything with you.
This is the method we'll detail in the rest of this guide.
How Many Lights Based on Staircase Length
The basic rule for effective stair lighting: every landing (top and bottom) must be lit, and the eye must be able to identify each step effortlessly. No need to install a light bar for every step on the wall — it creates visual clutter and offers no additional safety benefit.
For Staircases Up to 8 Steps
One light at the top and one at the bottom are usually sufficient. If the staircase is straight and the bottom landing is clear, a single light bar at the top can illuminate the entire descent.
For Staircases 8 to 15 Steps
Two or three well-placed light bars cover the entire area: one at the bottom, one midway if the staircase turns or if the length creates a shadow zone, and one at the top. The goal is that from any point on the staircase, at least one light source is visible and sufficient to distinguish the steps.
For Staircases 15 Steps and More
Three lights are the minimum, distributed evenly along the height. If the staircase has turns or intermediate landings, each 'section' should have its own lighting. It's less about lumens and more about visual continuity.
For more on placement and automation of this type of lighting, check out our guide on automatic lighting for high-traffic areas — the principles apply directly to stairs.
Choosing the Right Color Temperature for Nighttime
This detail significantly impacts nighttime comfort. And it's often poorly configured in DIY installations.
Cool White vs. Warm White: What's the Real Difference?
6000K (cool white) lighting on a staircase at night is harsh. It dilates pupils, disrupts sleep if you get up to use the restroom, and creates an unpleasant cold impression. Conversely, warm white around 3000K produces a soft light, similar to a nightlight, which guides without glare.
For nighttime stair lighting, 3000K is the standard. This temperature allows you to clearly see the steps without being blinded, and it naturally blends into the evening ambiance of a home.
What if the Staircase is Also Used During the Day?
If your staircase has few windows and you also use it during the day, a neutral white (4000K) might be a better compromise. But if it's solely for securing nighttime passages, stick to 3000K. With an adjustable brightness light bar, you can always modulate the intensity as needed.
Step-by-Step Installation: Wireless LED Light Bar on Stair Wall
Here's the concrete method for installing one or more LED light bars on the side wall of a staircase, without cables or an electrician. Skill level: accessible to everyone. Estimated time: 10 to 20 minutes for 3 light bars.
Materials needed: Rechargeable LED light bar(s) with adhesive mounting, microfiber cloth, possibly a tape measure to center positions.
Step 1: Clean the Mounting Surface
Wipe the wall at each intended location with a slightly damp, then dry, cloth. The slightest trace of dust or grease reduces adhesive strength and can cause the light bar to fall after a few weeks. Wait for the surface to be completely dry before continuing — two or three minutes are enough.
💡 Pro Tip: If your wall is textured (stucco, granular finish), industrial double-sided adhesive holds less well. In this case, use screw mounting if the light bar allows, or opt for reinforced adhesive specifically for textured surfaces.
Step 2: Position the Mounts
Before sticking anything, hold the light bar against the wall at the intended location and check the lighting angle. For stair lighting, the ideal is to place the light bar 8 to 16 inches (20 to 40 cm) above the step surface, angled slightly downwards to guide the eye. Lightly mark the position with a pencil if you have multiple light bars to align.
💡 Pro Tip: Avoid placing the light bar exactly at eye level for a child or a seated person — direct glare would be uncomfortable. Aim for the lower wall area, between 12 and 28 inches (30 and 70 cm) from the floor, depending on step height.
Step 3: Attach the Adhesive Mount
Remove the protective film from the double-sided adhesive, firmly press the mount against the wall for 20 to 30 seconds, applying even pressure. Do not pull on it for the next 24 hours — the adhesive needs this time to reach full strength. If your light bar uses a magnetic system, the mount stays fixed to the wall, and the light bar can be removed and reattached freely.
💡 Pro Tip: You're installing a light bar on a staircase, so you're likely working in an awkward position. Use a small work light or your phone's flashlight to see exactly what you're doing before permanently adhering.
Step 4: Configure Operating Mode
Once the light bar is in place, set it to motion sensor mode rather than continuous mode. This offers two benefits: the battery lasts much longer, and the staircase remains softly dark (more pleasant and less disruptive to sleep) until someone actually uses it.
Adjust the sensor sensitivity so it detects movement at the bottom of the stairs before you step on it. The ideal: the light turns on as you approach, not when you're already halfway up. To learn more about this, check out our article on optimizing motion sensor sensitivity.
Also, select 3000K if multiple options are available, and adjust brightness to a comfortable level for nighttime — no need for maximum brightness if the light bar is close to eye level.
Step 5: Test and Adjust
Go up and down the stairs several times to ensure each light bar activates at the right time and illuminates the correct areas. Check that no step remains in shadow between two light bars. If an area seems underlit, slightly reposition the affected light bar — magnetic mounting allows for effortless adjustment.
Also, test its behavior at night by turning off adjacent room lights. It's under these real conditions that you can judge if the lighting is sufficient.
Quick Checklist Before Finalizing Installation
- Each step is visually identifiable from the bottom and top of the staircase.
- No light bar directly glares into eyes when using the staircase.
- The sensor triggers before stepping on the first stair.
- Temperature is set to 3000K (warm white).
- Adhesive surfaces were cleaned before installation.
- Light bars are fully charged before use.
- Motion detection mode is activated (not continuous permanent mode).
What It Really Costs: Wired vs. Wireless
The comparison is rarely made clearly, so here are the facts.
Under-nosing lighting with wired LED strips for 12 to 15 steps means 12 to 15 strip segments, aluminum profiles, a power supply, and necessarily an electrician to connect everything properly. In practice, this typically falls within a range of $500 to $1,000 depending on the region and finishes. It's beautiful, it's permanent, but it's a real project.
An installation with 2 to 3 wireless LED light bars on the side wall costs a few tens of dollars, 10 minutes to install, zero cables, zero electrician. It's not the same visual aesthetic — let's be honest — but in terms of safety, the result is just as effective. And you can move everything if you change your mind or move homes.
If you have elderly parents or someone with reduced mobility at home, automatic motion sensor light bars are often the quickest solution to implement. No need to wait for a quote or an intervention date. The Movement 3.0 from Lumic perfectly addresses this use case: magnetic no-drill mounting, motion sensor + ambient light sensor (only turns on if it's dark enough), 3000K temperature available, and a 3000 mAh USB rechargeable battery with up to 4 to 6 weeks of battery life in motion detection mode depending on the model. One or two light bars placed on the stair walls are enough to cover nighttime passages. 5-year warranty, 90-day returns.
To compare different options on the market, take a look at our selection of the best indoor motion sensor lights.
Common Mistakes to Avoid in Stair Lighting
Too Much Light Instead of Well-Placed Light
The classic mistake is to multiply light sources, thinking that brighter means safer. In reality, overly intense lighting on a staircase at night causes glare and distorts depth perception. Two or three well-positioned light bars are better than six poorly oriented ones.
Using Cool White for Nighttime
5000-6000K white on a nighttime staircase is harsh and counterproductive. It disrupts sleep if you get up at night and creates a strong contrast with the rest of the dark house. Stick to 3000K for all nighttime use, without exception.
Adhering Without Cleaning the Surface
Industrial double-sided adhesive is very effective on a clean, dry surface. On a slightly dusty or greasy wall (often the case in high-traffic areas), it loses some of its strength. A light bar falling on a staircase is a real danger. Take two minutes to clean before adhering.
Placing the Light Bar Too High on the Wall
A light bar at 5 feet (1.5 m) high illuminates the staircase ceiling, not the steps. For effective lighting, the light should be close to the steps — between 12 and 28 inches (30 and 70 cm) high depending on the configuration. The lower the light source, the more it creates a grazing light that reveals the depth of each step.
If you want to know more about the longevity and maintenance of wireless LED light bars, check out our article on rechargeable LED solutions and their lifespan.
In Summary: Which Stair Lighting to Choose
If you're completely renovating your staircase and have the budget, LED strip lighting under the stair nosing offers the most beautiful aesthetic — but plan for the budget and an electrician. If you want to quickly secure a staircase, help elderly parents, or simply avoid dark passages without major work, wireless LED light bars on the side wall are the most accessible and quickest solution to install.
In all cases: 3000K for nighttime, motion sensor activated, low wall mounting. These three rules do 90% of the work.
To further your thinking on material selection, consult our complete guide to choosing your LED light bar according to your use and configuration.