
Looking to light up under your kitchen cabinets and wondering whether to go with an LED strip light or another solution? Good question. The kitchen LED strip light is often presented as the ideal solution — flexible, discreet, customizable. And it's true. But there are things you're rarely told before buying.
This guide aims to be honest: a kitchen LED strip light is an excellent option for DIY enthusiasts who want a polished look. For others, less technical alternatives get the job done in 30 seconds. We'll give you both sides.
What Exactly is a Kitchen LED Strip Light?
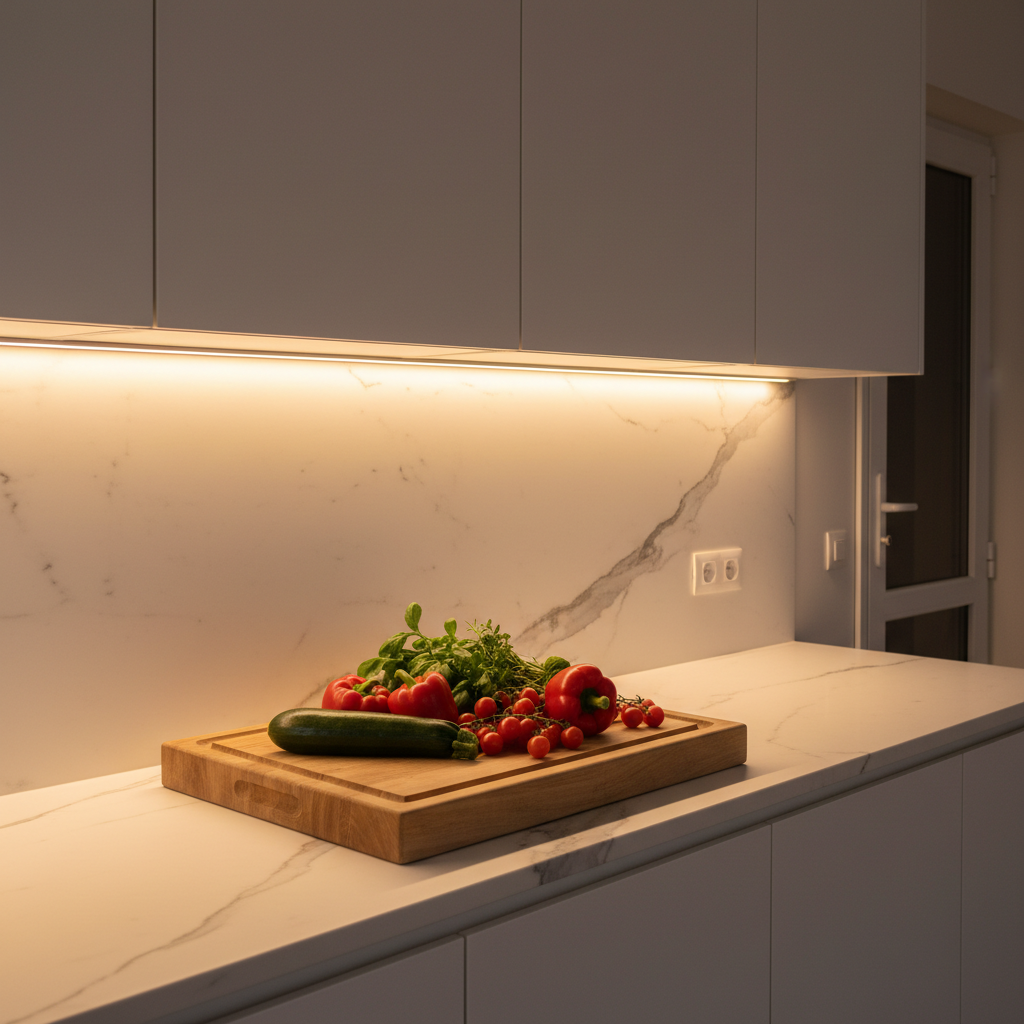
An LED strip light (also called an LED tape light or LED light bar) is a flexible strip equipped with small light-emitting diodes, which you stick under your cabinets or along a surface. It can be cut to the desired length, adapts to corners and angles, and provides very continuous lighting, with no visible light dots.
That's why it's popular: the result is clean, linear, and visually discreet. For an 70-inch (1.80 m) countertop with homogeneous lighting along its entire length, it's hard to beat in terms of pure aesthetics.
LED Strip vs. LED Tape vs. LED Light Bar: Are They the Same?
Yes, these are three ways to refer to the same product. "LED strip," "LED tape," "kitchen LED light bar" — these are interchangeable terms for a flexible diode strip. The real differences lie in the density of LEDs per foot, the quality of components, and the light output, not the name.
Why is the LED Strip Light So Popular in Kitchens?
Mainly for its quality-to-discretion ratio. Tucked under an upper cabinet, it completely disappears from view and projects light directly onto the countertop. It's the cleanest functional lighting visually — especially in modern kitchens with handle-less cabinets and sleek lines. For kitchens that are an integral part of the living room, aesthetics matter a lot.
What No One Tells You About Installing an LED Strip Light
This is where things get complicated. Installing an under cabinet LED strip light isn't just "sticking a strip and plugging it in."
Necessary Equipment (Beyond the Strip Itself)
A complete kit includes several distinct elements that you must purchase separately or ensure are included:
- The LED strip light itself (sold by the foot or in 16.4-foot (5 m) rolls)
- A transformer / power supply suitable for the strip's length and wattage (12V or 24V depending on the model)
- An aluminum channel (optional but recommended for heat dissipation and appearance)
- A diffuser to soften the light and prevent the "dot effect"
- Connectors if you're working with multiple segments
- A dimmer if you want to adjust the intensity
The cost of a well-assembled complete kit typically ranges from $40 to $80, depending on the length to cover and the quality chosen. And that's not counting installation time: 1 to 2 hours on average for someone doing it for the first time.
Cutting and Connections: Where People Mess Up
The LED strip can only be cut at designated points, marked every few inches. Cutting elsewhere will burn out the diodes. For corners and junctions between segments, you must either use click-in connectors or solder — and soldering an LED strip requires some practice. A bad connection, and part of the strip won't light up.
It's not insurmountable, but it's real DIY work. Not an all-in-one plug-and-play.
And After Installation? The Stuck-On LED Strip is Permanent
The double-sided adhesive integrated into LED strips is often aggressive once in place, especially on wood or melamine. If you want to reposition or move your installation — because you're changing cabinets, moving, or simply didn't measure correctly — you risk damaging the surface. Try repositioning an LED strip that's been stuck for 6 months: good luck.
For flexible kitchen LEDs in a permanent installation, it's perfect. For someone who wants flexibility, it's a real constraint.
Which LED Strip Light to Choose for the Kitchen?
If you decide to go for it, here are the truly important criteria for choosing your kitchen LED strip light.
LED Density Per Foot
The higher the density (expressed in LEDs/ft), the more uniform the lighting. For a kitchen, we generally recommend a minimum of 60 LEDs/ft. Below that, you risk seeing distinct light dots on the countertop, especially with a light diffuser. At 120 LEDs/ft, the result is truly continuous and clean.
Color Temperature: Warm White or Cool White?
This choice really changes the ambiance. For the kitchen:
- Warm White (2700-3000K): cozy, inviting atmosphere — suitable for a kitchen open to a living room, or for evening use
- Neutral White (4000K): balanced light, good for cooking without eye strain
- Cool White (6000K): bright light, ideal for precision tasks but less pleasant for everyday use
For mixed use (cooking and ambiance), an adjustable temperature strip is an option, but it further complicates installation (RGBW or CCT strip, dedicated controller).
Power Supply: 12V or 24V?
12V strips are more common and often cheaper. 24V strips support longer lengths without light loss at the end. For a standard kitchen (less than 10 feet of strip), 12V is more than sufficient. Beyond that, 24V is preferable to avoid a light degradation effect.
LED Strip Light or LED Light Bar: Which to Choose?
This is the real question many people ask. For an optimal countertop lighting guide, both solutions are relevant — but not for the same user profile.
| Criterion | Kitchen LED Strip Light | Rechargeable LED Light Bar |
|---|---|---|
| Installation | 1-2 hours, tools required | Less than a minute, no tools |
| Total Cost | $40-$80 (complete kit) | Single price, all-inclusive |
| Aesthetics | Very clean with channel | Sleek design depending on model |
| Flexibility | Adapts to all lengths | Fixed lengths available |
| Repositionable | No (permanent adhesive) | Yes (magnetic) |
| Wiring | Required (mains) | None (USB rechargeable) |
| Motion Sensor | Possible (separate module) | Integrated on some models |
| Ideal for | DIYers, permanent kitchen setup | Renters, standard kitchens |
For people who enjoy DIY and want to customize every detail of their installation — precise cutting, perfect angles, ultra-smooth finish with an aluminum channel — the LED strip light is the way to go. The result is truly beautiful when done right.
For those who just want light under their cabinets now, without the hassle of power supplies, connectors, and permanent adhesive, a rechargeable light bar does the exact same functional job in much less time. To learn more about this topic, the article on wireless kitchen lighting compares the available options in 2026.
Common Mistakes with Kitchen LED Strip Lights
Even experienced DIYers can botch their installation. Here are the most frequent pitfalls.
Underestimating Power Supply Wattage
This is the number one mistake. If your power supply is barely at the limit of the strip's wattage, you'll have stability issues, overheating, and even reduced lifespan. The rule: plan for a power supply with at least a 20% margin over the strip's total wattage. A 10W/ft strip over 6.5 feet (2 meters) = 20W minimum, so get a 25-30W power supply.
Not Planning for an Aluminum Channel
An LED strip stuck directly under a cabinet without a channel heats up more (poor heat dissipation) and results in visible light dots. A channel with a diffuser completely changes the visual outcome. It's an extra $10-$15 but makes a real difference.
Poorly Managing Angles and Corners
In an L-shaped kitchen, you need to navigate corners. Corner connectors exist, but they often create a dark spot at the junction. The professional solution: cut the strip at each corner and make soldered connections, or use quality connectors. This is where many people give up.
Choosing a Strip That's Too Powerful (or Not Powerful Enough)
A strip that's too powerful under a low cabinet creates aggressive, dazzling light when you're cooking. Too weak, and the countertop lighting remains insufficient. For standard kitchen use, moderate power with a good diffuser is preferable to very powerful without a diffuser.
An Alternative to Consider if You're a Renter or in a Hurry
If your main hurdle with LED strip lights is the technical installation or the inability to drill and wire in a rented apartment, there's an alternative worth checking out.
The Movement 3.0 by Lumic is a USB-rechargeable adhesive LED light bar with an integrated motion sensor. It attaches in less than a minute via a magnetic mount — no cables, no electrician, no permanent adhesive. You can reposition it whenever you want, and recharge it like a phone.
It's available in 9 inches (~150 lumens) or 15.7 inches (~320 lumens), with three color temperatures (3000K, 4000K, 6000K) and adjustable brightness. The 3000 mAh battery lasts approximately 4 to 6 weeks in motion detection mode, depending on usage. It's not an LED strip light — it's a different solution, designed for those who want immediate results without compromising on durability (5-year warranty).
If you want to compare both approaches in detail, the guide on rechargeable LED strip lights also explores this question from the perspective of mobility.
How to Install an Under Cabinet LED Strip Light: The Steps
For those who want to dive in, here's the logical sequence for a clean installation.
Step 1: Prepare and Measure
Measure the total length to cover. Add 10% for cuts and contingencies. Note where you need to navigate corners. Identify where the transformer will be plugged in — it must be accessible and ventilated.
Step 2: Choose and Buy the Right Kit
Purchase: strip (minimum 60+ LEDs/ft density), power supply with a 20% margin, aluminum channels with diffusers, suitable connectors. Avoid ultra-low-cost, no-name kits: lifespan and light uniformity quickly suffer.
Step 3: Prepare the Surface
Thoroughly clean the surface under the cabinet. The adhesive on the strip (or channel) won't stick well to a greasy or dusty surface — and under kitchen cabinets, that's often the case. A wipe with isopropyl alcohol makes a real difference.
Step 4: Attach the Channels, Then the Strip
Attach the channels first (screws or reinforced double-sided adhesive). Then slide the strip into the channel. Cut at the designated points. Connect the segments and the transformer.
Step 5: Test Before Finishing
Before attaching the diffuser and completing the installation, plug in and test each segment. It's much easier to fix a bad connection at this stage than after everything is finalized.
For more ideas on how to integrate this lighting into a modern kitchen, the article on modern lighting trends provides concrete examples of successful configurations.
Key Takeaways on Kitchen LED Strip Lights
The kitchen LED strip light is an excellent solution — for the right reasons and the right profile. If you enjoy DIY, your installation is permanent, and you want the best possible visual result on your countertop, an LED strip with an aluminum channel is hard to beat. Expect to spend $40-$80 on materials and 1 to 2 hours of your time.
If, however, you just want light under your cabinets without the hassle — because you're a renter, you don't want to deal with connectors and power supplies, or simply because you want it done tonight — a rechargeable light bar does the same functional job in much less time. The guide on wireless countertop lighting and the article on rechargeable LED light bars can help you decide if you're still unsure.
Both solutions have their place. What matters is choosing the one that truly fits your situation — not the one that seems most impressive on paper.